
Tru Blu installation & ownership guide
Skimmer installation
Keep the integrated skimmer accessible and operating at the correct waterline.
Use this guide with the installation detail and equipment manuals supplied with your pool. Your site approval sets the required inspections.
Before connecting
- Identify the supplied skimmer body, basket, lid, seals and outlet from the packing list and connection drawing.
- Check that decking or landscaping will leave the lid, basket and connections accessible.
Connection and seals
- Connect using the supplied fitting arrangement and tightening instructions. Support the pipe independently.
- Keep seal faces clean and avoid overtightening plastic components or distorting the shell around the connection.
Commissioning
- Fill to the operating waterline marked in the supplied instructions so the skimmer can draw surface water without sucking air.
- With circulation running, check surface draw and connection seals. Investigate air in the pump rather than simply increasing run time.
Owner handover
- Switch off and isolate the pump before lifting the basket. Do not reach into running suction equipment.
- Show the owner how to check water level, empty leaves and refit the basket and lid correctly.
Illustrated installation manual
Work through the drawings and job checks below, or download the same sequence as a PDF. Open a drawing to zoom into its labels.
01Identify the components before assembly
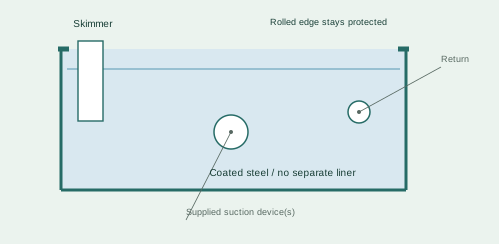
- Match the skimmer, return and suction parts to the supplied pool connection drawing. Separate different bodies, covers, seals and screws.
- Check openings and coating for damage. Protect the rolled edge and internal surface while working.
- Assemble only the fittings intended for the supplied shell adaptor. The coated shell has no vinyl liner to clamp or cut.
- Keep the original suction-cover fasteners and any security caps with the cover. The complete suction arrangement must remain as supplied.
This identification drawing does not prescribe outlet spacing, flow rating or hole-cutting positions.
02Seal the wall penetration
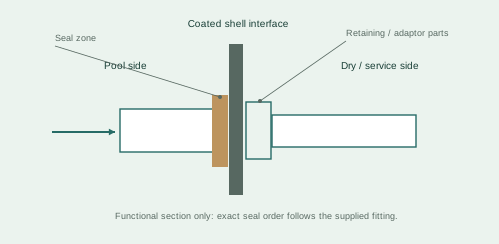
- Lay out the fitting body, shell interface, seal components and retaining hardware in the order shown in that fitting’s installation drawing.
- Clean the contact faces without damaging the coating. Apply only the specified coating-compatible sealant to the instructed face.
- Hold the inside body in alignment while fitting the outside retaining hardware. Tighten by hand or to the fitting-specific requirement; avoid twisting the shell interface.
- Support the attached pipe so the seal is not loaded sideways. Allow sealant cure before filling.
The section illustrates sealing function. Gasket count, sealant face and adaptor shape vary by supplied fitting; it is not a universal stack order.
03Fit the return and secure suction covers
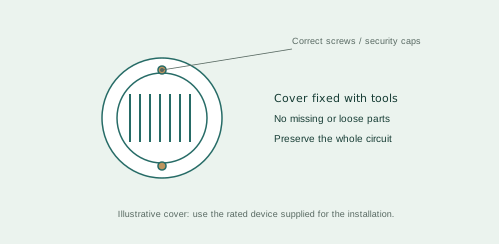
- Align return components without transferring pipe weight to the shell. Keep seals seated while tightening the supplied retaining parts.
- Fit every suction cover using its correct fasteners. Secure it so it cannot be removed without tools.
- Use the supplied connection arrangement and approved device rating. Do not blank one inlet, substitute a lower-rated cover or remove a cover to increase flow.
- Complete a static leak inspection and a running inspection before swimming. Stop operation if a cover is missing, loose or broken.
For Spa Electrics Pro-Suction, material-compatible cement and the model-specific installation diagram govern the fitting connection.
04Set up the integrated skimmer
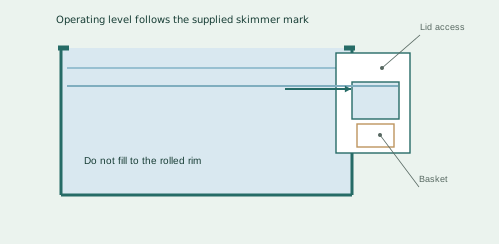
- Check that the skimmer opening and connected circuit are clear of installation debris. Install its supplied basket, lid and any weir components correctly.
- Set the operating waterline using the supplied mark or skimmer instructions; it must keep the intake supplied without exposing the suction to air.
- During first circulation, verify free movement of the weir if fitted and accessible basket removal.
- Keep the basket access clear after decking. Do not dose concentrated chemicals into the skimmer.
- Fitting models / photographs
- Sealant cure completed
- Suction covers / fasteners checked
- Operating waterline
- Static / running leak results
Skimmer internals differ by model; this is an access and waterline diagram.
Manufacturer instructions & references
Keep the instructions for your exact supplied model with this guide.
Spa Electrics fitting manuals ↗Completion checklist
- Skimmer lid and basket accessible
- Pipe supported
- Operating waterline correct
- No air or seal leaks
- Safe basket cleaning demonstrated
Help when you need it.
Installing the kit yourself or coordinating trades? Send your order number, photographs and the step you need help with.
contact@trublupools.com.au ↗