
Tru Blu installation & ownership guide
LED light installation
The lighting upgrade includes one underwater light and its transformer/control package. Plan cable access before the shell is filled.
Use this guide with the installation detail and equipment manuals supplied with your pool. Your site approval sets the required inspections.
1. Plan the cable route
- Locate the light and driver using your order’s lighting layout. Choose a driver position that is accessible, ventilated and protected as the supplied manual requires.
- Plan conduit and cable access before decking or retaining works conceal the route. Allow the manufacturer’s service cable arrangement.
2. Fit the supplied light
- Use the mounting, seal and coating-protection detail supplied for your exact light and shell. Do not drill to a generic wet-niche or fibreglass template.
- Keep the cable undamaged and follow the permitted cable lengths and connection method. Do not make improvised underwater joins.
3. Connect electrically
- A licensed electrician must complete mains supply, protection and required bonding. The underwater light is used only with its compatible specified driver.
- Do not substitute an arbitrary transformer or alter driver output settings. Keep mains wiring and the light circuit in their required separation.
4. Test and record
- Check seals and fittings during filling. Operate the light only in the conditions stated in its manual; some underwater lights must be submerged for cooling.
- Demonstrate the control functions and record light and driver models, installation details and warranty documents.
Illustrated installation manual
Work through the drawings and job checks below, or download the same sequence as a PDF. Open a drawing to zoom into its labels.
01Plan the light and driver together
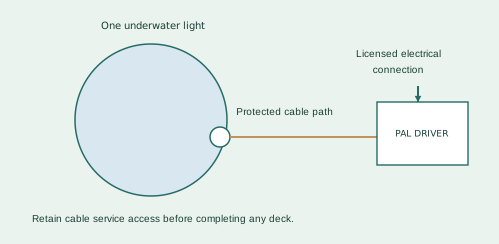
- The optional package comprises one underwater light with its transformer/control package. Match the cable connector, driver and light model before assembly.
- Show the light, protected cable route, service access and driver location on the plan before the pool is placed or decked.
- Keep a serviceable cable path and the access required by the actual light assembly. Protect the cable from sharp steel edges and abrasion.
- Coordinate driver location, protected supply and pool-zone requirements with the electrician.
The purchased prototype pack was PAL 54-EGFSPR-24 with a 24 m cable and single-zone driver. Exact mounting uses the supplied shell adaptor.
02Mount, seal and protect the cable
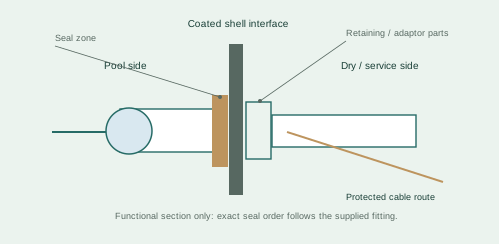
- Inspect the factory-prepared opening or supplied mounting adaptor and the coating before fitting the light. Use the light-specific seals and retaining parts.
- Feed the cable through its protected route without pulling hard on the plug or light body. Keep the original connector dry during assembly.
- Complete sealing and retention using the package instructions. Use the mounting method intended for the coated shell and its supplied adaptor.
- Preserve access to remove the light for service. Do not hide connectors or cable access behind permanent decking.
No hole-saw size, mounting depth or gasket stack is assigned to the coated steel shell by a fibreglass-format manual alone.
03Connect, wet-check and demonstrate
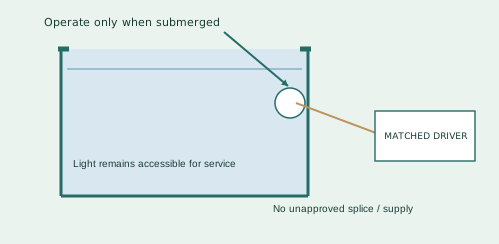
- The electrician installs the supply and matched PAL driver using the instructions for that exact package. Do not substitute an unrelated power supply.
- Complete the seal cure and water leak check. PAL underwater-light instructions require the light to be submerged for operation.
- Test switching, colours and remote functions after electrical completion and correct filling. Record the package and driver serial numbers.
- Demonstrate normal operation and the accessible service route. Isolate electrical power before any later removal or inspection.
- Light / driver model and serial
- Cable route / service access
- Electrical certificate reference
- Wet seal / lighting test
The sealed underwater connector is not a place for improvised silicone, adhesive or an unapproved cable splice.
Manufacturer instructions & references
Keep the instructions for your exact supplied model with this guide.
PAL light and driver instructions ↗Completion checklist
- Exact light and compatible driver used
- Cable route and service access ready
- Seals fitted correctly
- Licensed electrical work complete
- Operation checked to supplied manual
Help when you need it.
Installing the kit yourself or coordinating trades? Send your order number, photographs and the step you need help with.
contact@trublupools.com.au ↗