
Tru Blu installation & ownership guide
Deck and recessed installation
Plan the pool, independent deck structure, retaining works and drainage together before excavation.
Use this guide with the installation detail and equipment manuals supplied with your pool. Your site approval sets the required inspections.
Illustrative section only. Use the foundation and drainage detail supplied for your model and site for dimensions and construction.
1. Plan the layout
- Deck integration and/or recessed installations are planning options. Pool support, deck structure, safe access and barriers need site-specific assessment.
- Set the desired rim and deck levels against the finished ground, foundation build-up and operating waterline. Allow access to the skimmer, pipe unions and light cable route.
2. Separate structural loads
- A deck must carry its own weight and occupants through its own supports. Do not bolt structural deck loads into the pool rim or shell.
- For a recessed layout, use the retaining and support arrangement in your site documents so surrounding soil and compaction loads are not transferred into the shell.
3. Manage drainage
- Plan surface runoff and groundwater drainage before digging. A recessed pool must not sit in a pocket that collects water around the coated steel.
- Keep a service route to fittings and drainage inspection points. Any exterior protection must suit the shell coating and your supplied detail.
4. Sequence construction
- Excavate safely with allowance for the foundation, retaining structure, services and working access specified in the site design.
- Complete required inspections and leak checks before covering pipework. Follow the site construction sequence for fill, retaining works and reinstatement.
5. Finish safely
- Check deck edges, ladder access, barrier heights and climbable zones against the finished levels, not only the original ground.
- Do not use a generic direct-backfill recipe or a liner-drain instruction for this liner-free steel pool. Your retaining and drainage detail controls this work.
Illustrated installation manual
Work through the drawings and job checks below, or download the same sequence as a PDF. Open a drawing to zoom into its labels.
01Choose the installation arrangement
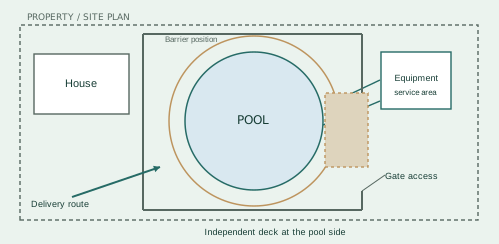
- Show the pool, deck, access opening, barrier and equipment on one coordinated plan. Plan which services will remain reachable.
- Keep the pool on its full foundation. The deck uses its own supporting structure and must not load the rolled edge.
- Allow removal of service panels without dismantling permanent barrier work. Keep safe circulation space and gate movement clear.
- For recessed work, identify retaining structures and drainage before excavation. The pool shell is not the retaining wall.
The layout is illustrative. Ground conditions and the site construction detail determine retaining and deck design.
02Separate soil loads from the shell
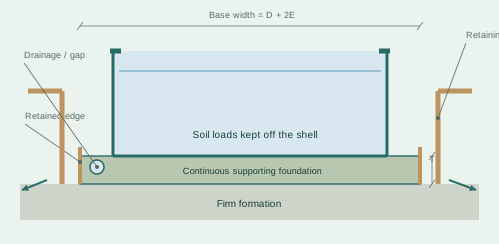
- Excavate to the set-out and construction detail with services located. Keep workers and plant clear of unsupported excavations.
- Build the specified retaining structure around the recess; keep earth and concrete placement from pushing directly on the shell.
- Continue full support beneath the pool floor. Keep the service gap, drainage and inspection access usable.
- Control groundwater and runoff through the prescribed drainage route. Avoid a trapped water pocket beside or below the pool.
The supporting base, retaining structure and drainage work together as one site arrangement.
03Build drainage you can maintain
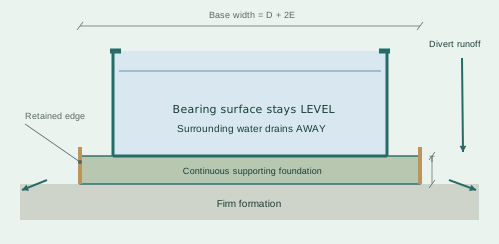
- Divert surface water around the recessed works. Keep downpipes and path runoff out of the service space.
- Provide the drainage collection and lawful discharge in the site detail. Keep cleanouts or other maintenance access reachable.
- Keep new trenches and excavations from undermining the pool foundation or neighbouring structures.
- Inspect the drainage and retaining work at the required stage before it is concealed. Photograph the completed arrangement.
- Retaining detail reference
- Drainage route / cleanout
- Inspection / photographs
Drainage is part of the installation, not a later patch after water collects.
04Finish the deck without trapping services
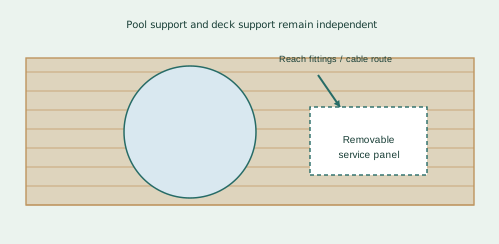
- Check that deck framing and fixings do not bear on, screw into or rub against the shell and rolled edge.
- Install removable access panels at the skimmer, valves, light cable path and equipment as required by the layout.
- Finish surfaces and edges so access is safe and water drains away. Check the barrier and gate in the completed deck arrangement.
- Complete the inspection sequence and startup checks before use. Keep construction drawings and as-built service photographs.
- Pool / deck support separation
- Service access panels checked
- Barrier / gate inspection
- Final drainage check
Do not conceal a leak-prone connection behind permanent boards.
Completion checklist
- Finished pool and deck levels planned
- Deck support independent
- Retaining loads kept off shell
- Drainage and service access provided
- Barrier checked at finished levels
Help when you need it.
Installing the kit yourself or coordinating trades? Send your order number, photographs and the step you need help with.
contact@trublupools.com.au ↗